The related source file for
this article is found in the "Examples/simpleChat" folder
under the name of "simpleChat.fla"
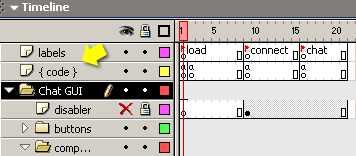
Open the source fla and have a look at the timeline. Don't worry
about all those layers, the ones in which we are interested now
are only the top two called "labels"
and "{ code }". Most of the other layers
contain the graphics for the chat interface.
In this chapter we are going to create a very simple chat application
that will be able to:
» connect to the server
» log in users
» send and receive user messages
Have a look at the "labels" layer and you will find three
different labels corresponding to 3 different "states"
of the application
Let's examine those states in detail:
1) Load:
The playhead will start here and it will wait until the movieclip
is fully loaded.
We've just implemented a very basic preloading system in order
to prevent that the movieclip attempts to connect to the server
before it's completely loaded.
2) Connect:
In this screen we will use most of the code from the previous example:
we will present a screen with a dynamic textbox saying "Connecting...".
Also we have one more hidden input field and a button that will
appear only when the connection is established.
The showLogin() method is responsible for showing/hiding
these 2 controls.
In case the connection attempt fails, those controls will never
appear and an error dialog box will be shown with a message in it.
We'll cover the error handling in depth in the next chapter, for
now we'd like to concentrate more on the chat application and see
how
we can send and receive messages in realtime.
Please note that the server connection code is very similar to
the previous article, however we've added two extra things:
- zone = "simpleChat"
The zone name corresponds to a zone defined in the server config
file. As you may remember you can define as many zones as you want
on the server and each of these is just like an isolated world where
all your users can interact. In this example we will use the "simpleChat"
zone that is already defined in the config.xml file,
found in the "SmartFoxServerLite/Server"
folder.
- smartfox.debug = true
The "debug" flag can be turned on to inspect the messages
that are sent and received by the client application.
You can safely turn it off if you don't want to see all those debug
info in the Flash output window.
When the "log in" button is pressed the sendLogin()
function is called which in turn calls the login method of the SmartFoxClient
object. The method takes two arguments: login(zone, username)
- function sendLogin()
- {
- if (!_global.isBusy)
- smartfox.login(zone, login_txt.text)
- }
The username can be whatever string but not all characters are
allowed in a username so when the user tries to log in, its user
name
is sent to the server, processed and then sent back to the client.
Also the server does not allow two identical usernames and in case
it finds a duplicate it will emit an error.
If you send and empty log in name the server will automatically
create a user name like "guest_n" where n is a progressive
number.
(If you're wondering what the _global.isBusy
variable represents, don't worry. It's just used by the error-message
window to
disable the other GUI buttons. We'll cover this topic in the 2nd
part of this article.)
In order to handle the server response to our login request we
need to handle the onLogin event. When the event
is fired an Object is sent to the client with the following properties:
success = boolean, determines if the login operation was successfull
error = string, an error message if the operation failed
The code that handles this event is the following:
- smartfox.onLogin = function(resObj)
- {
- if (resObj.success)
- {
- // Login Successfull
- _global.myName = resObj.name
- gotoAndStop("chat")
- }
- else
- {
- // Login Failed
- _gloabl.isBusy = true
-
- // Show an error window
- var win = showWindow("errorWindow")
- win.errorMsg.text = resObj.error
- }
- }
If login succeeded the user name is saved in a _global variable
otherwise an error window is displayed.
3) Chat:
After the connection and login events are handled we can move in
the chat label and start working on the application
itself.
First of all take a look a the image below. It shows how the interface
has been laid out:
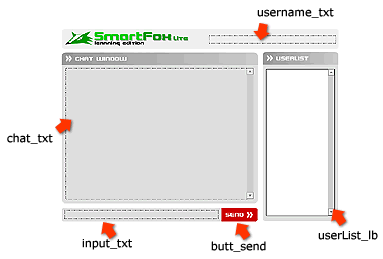
The most important folder in the timeline is the one called "components"
contained in the main "GUI" folder
There you will find the main 4 interface components: the chat multiline
dynamic text box, the user listbox, the chat input text box and
the user name dynamic text box.
The first thing we do in the code is writing our user name in the
top-rigth textbox so that we know our nickname in the chat room.
(see the 2nd line of code)
In the previous section we created an event handler to manage the
login response, but there's something more we should do to complete
this activity. When a login request is successfull you will receive
two responses or events: one of them is already known and the missing
one is called onRoomListUpdate. What is it all
about ?
Every time our login request is ok you will receive an onLogin
event and a onRoomListUpdate with a list of available
rooms to join.
This happens because upon reception of a successfull login
the client API automatically send a "getRoomList" request
to the server and you will need to setup an event handler for it.
Have a look at the onRoomListUpdate method and
you will notice that everything is very simple, just one line of
code:
- this.autoJoin()
This command tells the server to automatically join (enter) the
default room in the zone.
NOTE:
You can do this only if you have specified an autoJoin
room in the server config.xml file
What we are doing here is that we are ignoring the room list data
sent by the server and just proceed to joining the default room:
in a "real-world" application we should analyze the data
sent by the server and, for example, populate a list box with all
the available rooms and show their status, but this is far beyond
the purpose of this tutorial.
We'll analyze these more advanced concepts in the next articles.
Let's sum up what we've done so far:
1) We've established a socket connection with the server
2) We've sent the server a login request for a specific zone in
the server and handled the onLogin and onRoomListUpdate events.
3) We've sent an autoJoin request, asking to enter the defualt room
in the zone but we have not yet defined a response handler
so this is our next step.
- smartfox.onJoinRoom = function(roomObj)
- {
- var userList = roomObj.getUserList()
-
- // Clear text area
- chat_txt.htmlText = ""
-
- // Clear current list
- userList_lb.removeAll()
-
- for (var i in userList)
- {
- var user = userList[i]
- userList_lb.addItem(user.getName(), user.getId())
- }
-
- // Sort names
- userList_lb.sortItemsBy("label", "ASC")
-
- chat_txt.htmlText += "<font color='#cc0000'>>> Room [ " + roomObj.getName() + " ] joined</font>";
- }
Let's analyze the onJoinRoom function:
the first thing we should notice is the argument passed to the method:
roomObj.
roomObj is an instance of the SmartFoxClient
Room object and here's a quick view of its properties and methods:
» getId() = get room id
» getName() = get room name
» isPrivate() = is the room private ? (0 = false, 1 = true)
» isTemp() = is the room temporary ? (0 = false, 1 = true)
» isGame() = is it a game room ? (0 = false, 1 = true)
» getUserCount() = get # of users in the room
» getMaxUsers() = get capacity of the room
» getUser(id) = get the user Object from a known user id
» getUserList() = get the userList Object
» variables = a property Object containing all room variables
The methods we'd like to talk about right now are getId(),
getName(), getUserList()
The first two just return the unique id and name of the joined
room while the getUserList() returns an array of
User objects, one for each user already logged
in the room.
The User object is simpler than the Room obj and
it has just three methods:
» getId() = get user unique id
» getName() = get user nickname
» variables = a property Object containing all user vars
Time for a break? Too much info all in one shot? Dont' worry.
Everything is really very simple. It just takes a little time to
get accustomed to it. Take a look at the scheme below, it will
help
understanding the datastructure

From top to bottom you can see that each Zone
is a container of Rooms and each room contains
its Users.
All users can interact together when they are in the same room,
also they can see the rooms within their zone and change from
one to another. In other words this allows more applications (a
chat, a game, a whiteboard etc...) to run at the same time on the
server independently.
Does it make more sense? It should now! :-)
Basically you enter a zone which essentially is a container of
rooms.
Every room contains users and you can join one of them (actually
you can join more of one simultaneously) and start interacting with
the users inside.
Back to our onJoinRoom code:
we need to read the userList, get the name and id of each user and
populate the userList list box on stage.
First we get the list:
- var userList = roomObj.getUserList()
(remember, this is an array of User objects)
Then we cycle through it and add data to the list box component:
- for (var i in userList)
- {
- var user = userList[i]
- userList_lb.addItem(user.getName(), user.getId())
- }
Not so difficult? Uh? :-)
Ok, now for the final touch: let's sort the items in the list box
so that user names are in ascending alphabetical order.
- userList_lb.sortItemsBy("label", "ASC")
Voilà!
The last line of the method writes the name of the just-joined
room in the main chat text-area using a red font
[ MORE ON USER EVENTS ]
Before we move on to the sending/receiving message part, I'd like
to analyze two simple events that are handled in this
simpleChat application.
In order to have our application behave in the right way we need
to update our user list each and every time a new user enters
the room or leaves the room. This way we can have a real "real-time"
view on what's going on in the room.
To keep everything in synch SmartFoxServer will send us events called
onUserEnterRoom and onUserLeaveRoom
that we need to handle.
Scroll the source code down a little and look at the onUserLeaveRoom,
it's all very basic.
We can ignore the "fromRoom" argument as it is only used
when you are logged in more than one room at the same time.
The next parameter is the User object of the newly joined user,
so we can just take it's id and name and safely add it
to the listbox.
The onUserLeaveRoom handler is almost identical,
only this time you will receive the user Id of the client that left
the room.
In order to take its name out of our list box we have to loop through
the entire component data until we find the right id.
Once it's found we just remove it. That's all!
Also we add a line in the chat text-area with the name of the user
that left the room.
[ SENDING AND RECEIVING MESSAGES ]
An now for the fun part, let's send and receive messages like a
real chat!
We already have our input textbox ready for use and we have a big
"Send" button on stage that is linked to the sendChatMsg()
function.
Let's have a look at it:
- function sendChatMsg()
- {
- if (input_txt.text.length > 0)
- {
- smartfox.sendPublicMessage(input_txt.text)
- input_txt.text = ""
- }
- }
Wow! That's difficult! ;-)
We just check that there's some text in the input field and then
we send it to the other clients using the sendPublicMessage
command. Also we clear the input field so that it's ready for a
new message!
Now let's see how we handle the reception of public messages. The
event to look for is called onPublicMessage()
- smartfox.onPublicMessage = function(msg, user)
- {
- chat_txt.htmlText += "<b>[ " + user.getName + " ]:</b> " + msg
- main_sb.setScrollPosition(chat_txt.maxscroll)
- }
The event handler receives a message string (msg) and a User object
(user), also we set the scrollbar position to the maxscroll property
of the chat text-area. This way the last message sent is always
visible.
That's all for now. Please take your time to go through all these
instructions and also check the additional source code comments
as they can help you in better understanding the code flow!
Also be sure to have these concepts all clear in mind before proceeding
to the next section.
See ya in the next article.
Lapo
| 


 [SmartFox] Simple chat (part 1)